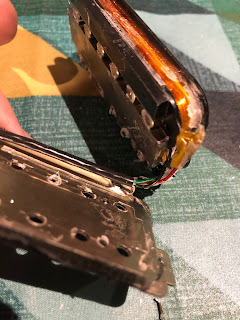
I understand the American-made version of the Wolfgang pickup is very good, but I have to say, the import version left me cold. To my ear, it sounded hard and sterile, lacking in the warmth and character I was looking for. No problem, I thought, I've got an old Seymour Duncan Custom Custom in my parts box, just like the one Eddie himself used through much of the 1980s. I'll just whip the Wolfgang pickup out and slap the Duncan in and ... oh. Nope.
IMPORTANT NOTES: I don't know which other pickup brands will fit the EVH baseplate; I only know that standard spaced Duncan pickups will. Be very careful about doing this in general, but give particular care to the replacement pickup's dimensions as manufacturer's "standard" spacing is anything but standard. Also, obviously, if you do this, do it at your own risk. There's every chance you could destroy your pickups if something goes wrong, so, ahem ... Fair Warning (sorry).
Here's how it's done:
1: Remove the EVH Wolfgang pickup.
2: Unsolder the connections on the underside of the pickup.
Blimey, that's a rat's nest under there! Each of the wires needs to be unsoldered from its terminal.
3: Remove the four brass bobbin screws to release the baseplate.
These screws fasten the main body of the pickup to the baseplate, as well as holding the two clips in place. Once removed, the pickup coils may remain held to the baseplate by the wax potting. Mine came free with a little encouragement, but if it's stubborn, applying some heat with a hairdryer should soften the wax enough to let them separate. You may or may not need to remove the tape from around the outside of the coils; I didn't have to. You should end up with a deconstructed pickup, including the baseplate, which we'll put to use shortly. At this point, I put the brass bobbin screws back into their holes in the pickup, just to save them getting lost - we'll use the Duncan's bobbin screws later on.
4: Disassemble the Duncan pickup.
Unlike the EVH pickup, the Duncan's pole screws pass through the baseplate, so they will need to be unscrewed until the ends are fully inside the pickup body. You will probably need to remove the pickup tape at this point; set it aside as it can be reused, unless the adhesive has worn off.
Next, remove the four brass bobbin screws from the bottom of the baseplate and set them aside - you'll need them later. You can then carefully pull the baseplate away from the coils, revealing the guts of the pickup.
IMPORTANT: Take note of how everything's put together inside (taking a photo is a good idea), paying particular attention to where the lead travels along the baseplate, and where the magnet and spacer bar go. You're going to have to put this all back together, so make sure to know how that goes. If you've removed the pickup tape from around the coils, you'll very probably find that the whole thing falls apart. Don't panic! It's easy to put back together again. One caution, however: take special care of the hookup wires that are now exposed at one end of the coils. You really, really don't want to break those.
Unsolder the ground wire from the baseplate, and slip the lead out through the hole. That's the disassembly done.
5: Reassemble the Duncan pickup on the Wolfgang baseplate.
Thread the Duncan's lead through the appropriate hole in the Wolfgang baseplate, and run it along the side wall, mirroring how it was in its original housing. You'll need to solder the ground wire in the corresponding position. The baseplate may have a covering of wax, so remove a small patch with some fine sandpaper before applying a little solder to tin the surface, then attach the ground wire.
Reassemble the component parts of the pickup, again mirroring how they were originally arranged, paying attention to where the spacer goes. Hopefully the magnet will have stayed in place under its own power. Everything should go together pretty snugly.
Tighten the two outer pole screws at least part way, just to anchor that coil, then use the Duncan's bobbin screws - NOT the Wolfgang's bobbin screws - to fasten the coils to the baseplate. Note: Be careful not to over tighten the bobbin screws because the plastic can be easily stripped.
Screw down the polepieces to where you want them - they should finish up with their ends roughly level with the baseplate feet, but they shouldn't be lower or you'll have problems fitting the pickup back in the guitar. Very, very carefully tuck the hookup wire back between the coils, take a meter reading to make sure nothing's broken (a Custom Custom should read around 14.4k) and then reapply the tape around the outside.
And you're almost done! It's just a matter of mounting the pickup into the guitar, soldering the appropriate wires to the volume pot (check the Seymour Duncan website for how to rig the pickup for two-conductor operation), stringing up, and enjoy!
Here's how it sounds:


